Imaging Techniques
Webcam imaging with Philips ToUcam 740 Pro
Chapter 2 - Image Capture
| Chapter 3 |

Capture Parameters
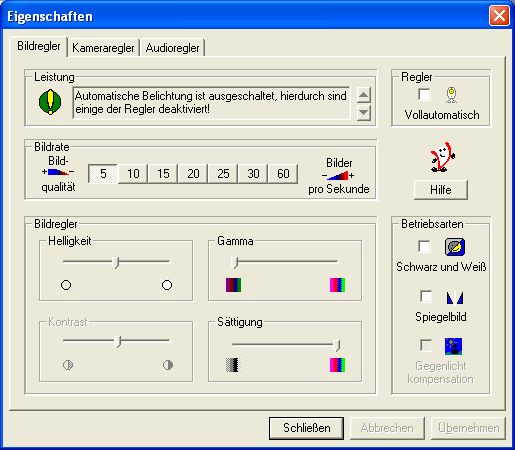
Capture parameters are usually controlled in the settings-dialog of the ToUcam supplied by the cam-driver:
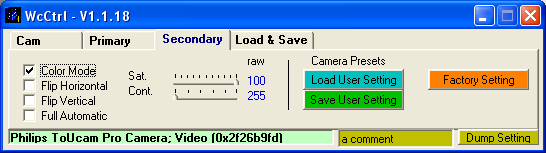
Another alternative of setting cam-parameters is WcCtrl by Martin Burri, a nice tool offering numeric controls, load- and saveable settings and settings-dump to clipboard:

Choosing framerate
The framerate affects image quality, the higher the framerate the more imge quality suffers - at least for recording at 640x480 pixels. This is simply caused by the limited bandwith of the USB1.x interface. Let's calculate some data-rates for several frame rates:
dr = (px*py*(cdepth/8)*fps*8)/(1024^2) [in MBit/second]
For px=640, py=480, cdepth=24 we get
dr[fps=5] = 35,15625 MBit/s
dr[fps=10] = 70,3125 MBits/s
dr[fps=15] = 105,46875 MBit/s
dr[fps=20] = 140,625 MBit/s
dr[fps=25] = 175,78125 MBit/s
dr[fps=30] = 210,9375 MBit/s
Unfortunately USB1.x allowes a max. bandwidth of 12MBit/s in fast tranfer mode. The camera hardware/driver has to use lossy data compression and reduction algorithms to transfer the video stream via USB1.x. It's obvious that image quality suffers noticable at 25 fps (ratio 15:1).
Reasons for high frame rates
- Fast changing/rotating objects (e.g. Jupiter, captures over 1.5min show rotation blur)
- Record as many frames as possible in a given time frame to capture moments of best seeing
Reasons for low frame rates
- Image quality ;)
Brightness
The brightness control is calculated into the image by the cam/cam-driver after the image information has passed analog/digital conversion. Leave the slider in the middle position (value 63 in WcCtrl with raw-units)! Increasing or decreasing the brightness will result in loss of information/headroom. We can modify brightness much better in image processing tools after the capture-process. Wrong brightness settings will lead to incorrect gain settings and can cause the "onion-ring effect" in Jupiter images.
Gamma
The gamma control should be set to zero for most
planets. Jupiter, Mars and Saturn's clouds feature low contrast and subtle
details. To capture these fine highlight-details as good as possible the
lowest gamma setting possible should be used. Some tests have shown that
even the lowest setting doesn't give a linear gamma curve with the ToUcam.
Recording hard contrasts like lunar craters with harsh shadows or sun-spots
is a different scenario, higher gamma values help to capture details in
the shadows.
Saturation
I record most planets with a color saturation of 80% to 100% delivering best results with my setup.
Gain
The gain stage applies an amplification to the
analog CCD-signal before analog to digital conversion. Image brightness
should be controlled by gain and shutter speed only, not by the brightness-setting
described above! The image brighness should be adjusted so that nearly
the complete dynamic-range is used without saturating pixels with the
maximum pixel value.
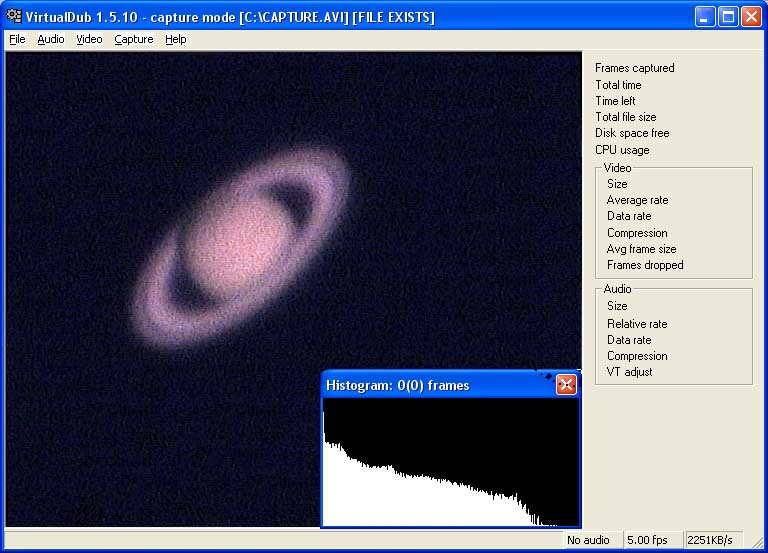
Adjusting gain with dark-adapted eyes tends to a too low setting. using
a capture-tool with a life-histogram helps to adjust image brightness
correctly. I prefer
VirtualDub for AVI-capturing:
Shutter speed
Shutter speed controls the exposure/integration-time for each single
frame.
Reasons for shorter exposure times:
- Short integration times can freeze fast moving seeing and result in sharper single frames
Reasons for longer exposure times:
- Longer exposure times allow lower gain settings resulting in less noise
Shutter speed and gain should be adjusted to match the current demands: Shorter shutter speeds for bad seeing-situations to receive sharp frames accepting more noise due to higher gain settings - longer shutter speeds for good seeing situations to receive best frame quality with low noise due to low gain settings.
Note that shutter speed times shown on the setting-panel aren't correct real times. The real integration time of the ToUcam varies with the frame-rate.
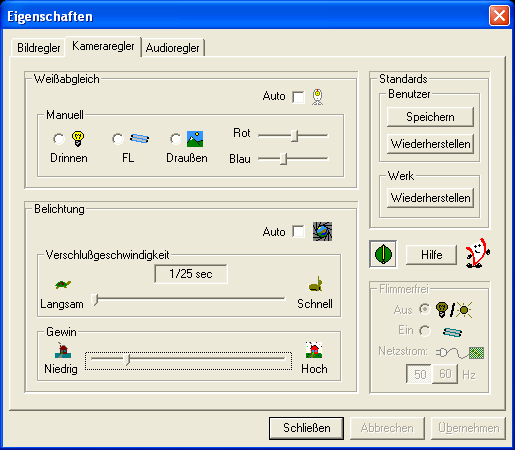
White Balance
Getting a proper white balance during AVI capture is quite important.
Major color corrections applied to the final image may result in loss
of information.
The white balance offers correction of the red and blue levels, the green
level is controlled indirectly by blue and red (turning red and blue down
equally will rise green turning red and blue up equally will lower green).
Many astro-webcammers use the auto option: Center your object in the preview
image. Check the auto button, wait for about 30s until the settings have
settled and uncheck the button and apply minor corrections manually if
neccessary. The automation should find a decent balance for most objects.
AVI length / capture time
| Chapter 3 |